IF you have followed the previous page you now have this in front of you.
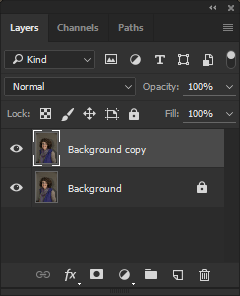
Every icon in this panel are now lit meaning that you select all of them. Don't.
This is your new layer. Rename it.
We are going to paint on it, make mess if you will. Select the brush tool (press B). To resize the brush press the bracket ] key to enlarge it and the inversed bracket [ to reduce it.
Once you are done, click on the eye to see your change disappear and reappear depending on the eye icon status.
If you want to undo anything it is not all that easy (Ctrl-Z for one step and Ctrl-Alt-Z for many steps).
If you try to use the eraser (E) it will not work as not only your edit is erased but what is inside the layer is affected too. To verify that, just uncheck the visibilty of your background layer.
Ok so this is not terribly efficient, is it? well, this is where a third layer comes into play.
Let's start from scratch. Press the funtion key F12 then Ctrl-J and finally create the third layer using Shift-Ctrl-N, you can use the 'paper icon', on the left of the trash can... Don't.
Using the short-cut you have a pop-up menu that gives you options for your new layer.
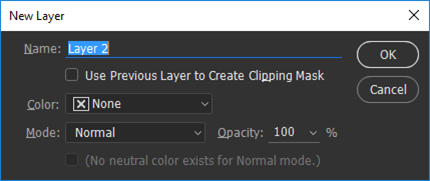
Name the layer
Ignore
Ignore
Ignore
Click ok.
Ok, so not you should be looking at something like this...
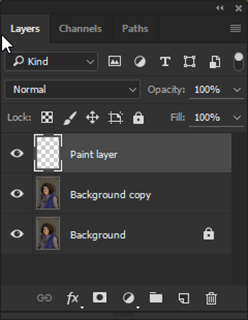
Make sure the layer is active and that the white rectangle is around the checkered icon.
Now paint on it, as much as you want.
Click on the eye on and off to see that your art work is only on this layer.
Use the eraser (E). This time the eraser works correctly and does not damage anything.
Time to up the antes...
See the opacity 100%? Click on the down arrow and play with the slider. Do I need say more?
While the Fill Slider appears to do the same (I know you tried it) this is not the case so don't get used to it.
Click on the mask icon (the rectangle with the dark circle)
A new icon appear after the link and it is selected (white rectangle with a frame around it). You have just created your first layer mask. It does not do anything, right? Press the letter D to set the default foreground and background to white and black.
Now invert it to black using Ctrl-I. The rectangle is now black and your artwork is gone. Basically you turn you effect on (white) of off (black). Note: If you hold the Alt key down when you create a mask it automatically will be inversed (Black).
The problem now is how to make something appears w/o removing the black mask. Well, use the brush tool, paint a large cross over the mask. What is white is now transparent and let you see some of your work. You just punched a hole onto the mask. If you think this is really not efficient and you are absoluetly right. Undo the cross (Ctrl-Alt-Z a couple of times).
Invert the mask to White. Everything is visible again. Select a black brush (Press X). Now using the brush paint over some of the area you want to hide. If you make a mistake? Switch to white (press X again). This is how you control a dominant layer, using a mask.
Ok, so now you should experiment on your own in order to remember what was done here. To do so from 'scratch' use the function key F12. This will return PS CC to the original image.
----
* You have learned:
How to duplicate a layer (Ctrl-J)
How to select the brush tool (B)
How to resize the brush key using the [ and ] keys
How to select the eraser (E)
How to use the eye icon to check a layer effect off/on
How to use the F12 key to reset a document to the 'openned default'.
How to undo one level (Ctrl-Z)
How to undo multiple levels (Ctrl-Alt-Z)
How to create a pixel layer (Shift-Ctrl-N) without using any option other than naming
How the Opacity slider affects the active layer influence
How to set the foreground/background to black and white (D)
How to create a mask using the mask icon
How to invert a mask (Ctrl-I) (note that if you do that on a pixel layer you will invert the colors)
How to change the color background from one to the other (X)
