Layers are used to create an effect on a base or background. Layers are cumulative and lie on top each other. The top layer effect affects everything underneath like the proverbial cherry on top.
Layers allow you to manipulate a pixel image non destructively. They are editable, can be switched on or off, ordered differently, duplicated and grouped. Basically layers are the bread and butter of photoshop.
That's it. Simple no?
Ok then... Read on.
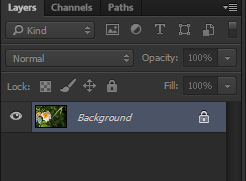
Open a capture in PS CC and look on the right side of your program window. Compare it what you see below and follow the instructions. Disregard the three sets of icons for the moment.
 |
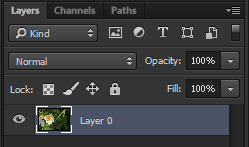
The first layer is the image itself. It is highlighted. It is named background and has a lock on the right side. This lock means that it is not editable. Usually most folks leave that layer alone to 'preserve it'. You can override that lock one of two ways: - Rename the layer - Click on the lock next to it. If you select to click on the lock the layer is automatically renamed 'Layer 0'. |
Now about the menu directly above the first layer... This is used to lock one aspect of a layer or everything. Let the mouse cursor hover each icon and you will have a descriptive popup. Click one and observe the lock that appears next to the layer.
Notice that the lock option you have used has changed the locked status symbol. The icon is not filled in. This is a visual reminder that the lock is partial.
You cannot select all but two partial lock options at any one time on a single layer. To select all three you must select the plain lock. Note that if you have selected one or more locks before using the generic lock these are still locked once you unlock the global one.
When a full lock is applied the two menus above the layer are greyed out meaning that the options under these two menus are disabled except unlock of course (See image below)
The third upmost menu is always active because it is not directly related to the layer options and features. It is used to find specific layers by filtering them. The on/off switch on the right of that menu simply indicates if a filtering criteria is active or not.
Now, let's go back to our first layer....
Notice that the layer is now highlighted by a white frame around it. This means the layer area is active and can be edited*. You will see this frame every time you use a layer. It signals what part of the layer is selected but not always pixel editable. There can be three editable options within a layer, two of them are masks. The third one is simply the options/settings related to the layer used. If it is unlocked of course. |
 |
By default a layer is applied in its entirety onto the layers below. You need to control that.
You have two types of layer controls:
- Global such as blending, opacity, fill and of course being able to turn the layer on or off.
- Pixel control such as selections, masking and conditional blending.
We will look at each one later on.
That's it. It is not more complicated than that.
-----
* Adjustement layers can be edited only through the layer effect option menu. If you try your paint or modify the pixels it will send you an error message. A pixel layer on the other hand will accept anything and everything pixel related.


