As mentioned before the top layer is also the top dog unless it is tied to the layer right below it.
The way layers interact with each other is what makes them great but also a bit hard to control once you enter the realm of blending options.
The basic interaction is the opacity. You can reduce the way a layer affects another by limiting its opacity using the opacity slider or typing in a percentage or clicking on the slider area and use the mouse to scroll up and down...
A slightly more advanced control that you have when dealing with the layer is the drop down menu located on the right side of the opacity slider. To get your head around that one, experiment, experiment, experiment and, oh, yeah, experiment.
Then you have the ever confusing layer options. A menu that is hidden from view unless you
- Click on the fx icon located at the bottom of the layer window, second icon on the left
- double click in the layer 'hot zone'
- right click on a layer and select blending option
- You can also access this meny usinf Menu > Layer > Style a long menu will appear. Honestly? Screw that, just click blending options. All the menu choices are here.
I will not cover much because not only it will take too much time but mainly because these options are used only in very specific cases that you will discover once I start creating a few tutorials.
What to retain out of this:
- General blending mode and opacity are the same options as in the layer edit view.
- Fill opacity is now using the RGB channels with other options. It does not when using generic layer options.
- Blend if... This is one of the most under used feature in layers despite being really powerful. It allows a layer to be applied depending on the luminosity of the primary layer and/or the one under it. Not only that but can use the layer RGB luminosity channels.
- The styles on the left are 'only' what you can do in addition the normal stuff.
As to messing up? Play with it and... good luck. Just remember:
- A checked box means the option is active.
- "+" adds a similar option set allowing you to use the same set of tools with different settings on the same layer.
- The trash icon is great!!! (for me that is)
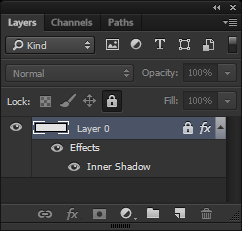
A fx icon appears where the lock is usually found. Once a blend mode is used you can lock a layer. (as I did to show the lock icon) Under the layer you have the list of blend style used A visibility eye that can be switched on and or off at any time either for all or just one option. |
 |
Do not forget: EX-PE-RI-MENT!!!


